
Documentation
Theme features
- Responsive design: looks great on desktops, laptops, tablets and mobiles. Give it a try on your iPhone or iPad now.
- Highly customizable: change colors, fonts, background image through the theme settings. No coding required!
- Great for SEO: uses the latest Shopify SEO features and product data is formatted for schema.org so that product listings are optimized on search engines.
- Branded checkout: a seamless checkout for your customers using your logo and color scheme.
- Dropdown menus: Support for 6 "mega menus" and each one can hold up to 4 sub menus.
- Customer accounts: customers can register, login, change addresses and view past orders.
- Flexible slideshow: a home page slideshow that can be any height.
- Home page content: feature products, collections or both on your home page. Optionally include welcome text too.
- Newsletter integration: easily link your Mailchimp account to the newsletter form.
- Social integration: share by Twitter, Facebook, Google+ and Pinterest.
Products per row
- Open theme settings and in the first section you can choose the number of products per row and per page...

Using Google fonts
It's easy to use Google fonts in your theme.
- First of all, Browse Google fonts to find a font you like.
- Click the "Quick-use" link...

- Select the variants of the font you want. In this example there are 3 variants but your font may have more or less...

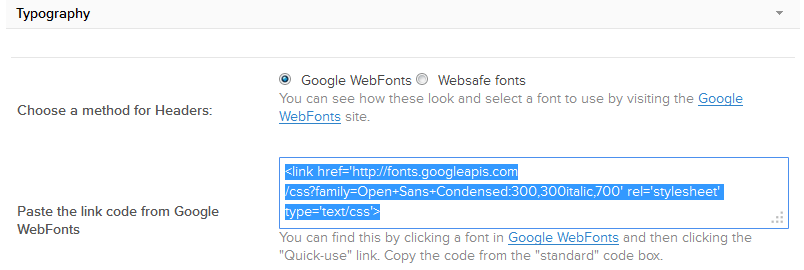
- Copy the code from the "standard" code box...

- Back in your Shopify theme settings, paste that into the "Typography" section...
- Switch back to Google WebFonts and copy the font name from section 4. Note you only need the font name as in the next screenshot...

- Paste that into the "Typography" section of your theme settings...

- And the last step is to save your theme settings
Adding a contact form
The navigation bar
The Fresh theme allows you to have up to 6 "mega menus". Each "mega menu" can have to 4 sub menus.
- First of all, you'll need a linklist that holds the main links for your navigation bar. By default, the theme uses the "Main menu" linklist. If you want to use a different one, you can create or edit linklists by clicking "Navigation" from Shopify's admin sidebar.
- You'll also need to create a linklist for each sub menu.
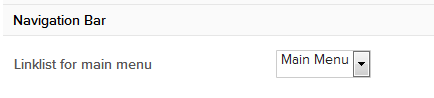
- Once you have your linklists, open theme settings and expand the "navigation bar" section and you can choose the linklist you'd like to use for the menu bar...
- Next, click the "Navigation bar - sub menus" section and you can select the linklists you want to appear under each main menu link.
Feature collections on your home page
Follow these steps to show featured collections on your home page...
- Add your products and organise them into collections
- Click "Navigation" from the admin sidebar then click "Add a linklist".
- Give your linklist a memorable name and add links to the collections that you want to appear on the home page. Then save.
- Click "Themes" from the admin sidebar then click "Customize theme".
- Click the section named "Homepage"
- Tick the checkbox named "Feature collections on homepage?"
- Use the "Linklist for featured collections" dropdown to select the linklist you created earlier
- Save your changes
- In the future, if you decide that you want to show different collections on the home page, all you need to do is modify the links in your linklist
Setting up the newsletter form
It's easy to link your newsletter form to a Mailchimp subscriber list. These instructions assume that we're using the new version of Mailchimp...
- You'll need a free Mailchimp account
- Login to your Mailchimp admin area and create a new list (or you can use an existing list)
- Click the list you'd like to use for holding your Shopify newsletter subscribers
- Click "Signup forms"
- Click "Embed a form"
- Click "Naked"
- Here's the only bit of the code you need to copy...

- Now, in Shopify admin, open theme settings, click the "Newsletter section" and paste that bit of code into the "Form action url" field
Adding HTML for an accordion
You add an accordion style section to a product description, page or blog. All you need is some simple HTML. For example this will give you an accordion with 2 sections...
<div class="gt-accordion">
<h4>First section title</h4>
<div>Content for first section goes here</div>
<h4>Second section title</h4>
<div>Content for second section goes here</div>
</div>
Adding responsive videos
You can easily add videos to your product descriptions, pages, blog posts etc. There's no need to add extra HTML. The theme handles that for you. All you need is the video embed code from somewhere like Youtube or Vimeo, like this...
Customer accounts
The Fresh theme has a full set of templates for customer accounts. To enable customer accounts for your store, you'll need to edit your preferences...
- In Shopify admin click "Settings" then "Checkout".
- Scroll down to "Customer accounts" and change the option to "Accounts are optional".
- Don't forget to save your changes.
Using the slideshow
- Create your slides in your favorite graphics editor. Suggested width is 1280px. Slides can be any height but for best results, make them all the same height.
- Open theme settings and expand the "homepage slideshow" section to add your slides.
- You can switch each individual slide on or off and each slide can link to a different URL.
- Use the slideshow options in theme setting to control the speed and effects for your slideshow...

Footer links
Theme styles
Visit the styles page to see how standard HTML is styled.


STAY IN TOUCH